GUI for Mudlet 3.1.0
Mapper
The mapper is by far the most complex part of the GUI, and it does have a bit of a learning curve. But whether you know the lands by heart or just started exploring, it is worth the time investment to learn how to work with it, so that you can create maps that are comprehensible and help you navigate around.
To get you started a small map over the Central Castle will be downloaded when you log in for the first time.
Mapper control panel
In the bottom part of the Mapper window is a control panel that lets you adjust various display options. It looks like this:

If you only see the top part, click on it and the panel will open. Clicking it again will hide the panel.
Moving the map view
The first six buttons (four direction arrow buttons and the two + and - buttons) are used to move the map view west, south, north, east, up and down respectively. You can also move the map using a mouse: hold the Alt key, press your left mouse button and drag the view in the desired direction.
To zoom the map in and out, use the scrollwheel.
Map display options
The next button to the right lets you switch between 2D and 3D view. In 3D view the whole map gets more complex and the control panel also gets another two rows of controls for rotating and otherwise adjusting the view. 2D view is the default view you start with.
You can change the relative size of rooms and exit lines using the number scales below. Note that for rooms a bigger number means a larger room size, while for exit lines the relation is reversed. The checkbox immediately to the right lets you change the shape of rooms from square (default) to round.
The next two checkboxes let you display additional information about rooms. The Info checkbox turns on the room info in the top left corner of the mapper window. The Room ID box shows room id numbers directly inside the room squares - it requires you to zoom in quite a bit for it to be readable, but can still be useful if you need to check room ids in the immediate vicinity.
In the mapper, transitions between areas are marked with an arrow exit and room coordinates reflect the relative position of rooms in neighbouring areas, but every area is drawn as a separate map. The Area dropdown menu lets you view maps for other areas than the one you are in at the moment.
Map context menu
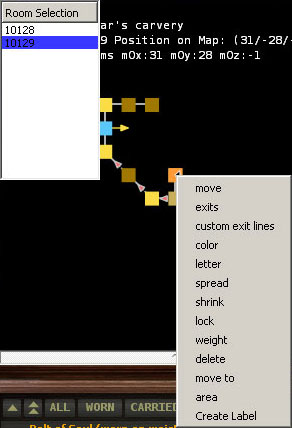
Left-clicking on a room will select it and right-clicking will bring up a context menu, which lets you manipulate the selected room. If several overlapping rooms occupy the same coordinates on the map, a Room Selection menu will pop up in the top left corner of the mapper, where you can click on the id of the room you want to manipulate. You can also select multiple rooms, either by left-clicking and dragging your mouse to cover a larger section of rooms, or by pressing Ctrl + click to add rooms or remove them from your selection.

These are the most useful actions available from the context menu:
Move
This lets you to move the selected room by dragging it around. Left-click to set the room in its desired position.
Color
Lets you highlight the room by changing its colour. Be sure to pick a colour number higher than 256 if you want your new colour to persist.
Letter
Marks a room, such as a shop, pub or hitchhike point, with a letter.
Spread / Shrink
Use with multiple selected rooms to increase or decrease the distance between them. Be careful though, since this can make them overlap with rooms outside your selection.
Delete
Deletes a room from the map.
Move to
Moves a room to specified coordinates. This is useful for moving rooms that are too far from their desired positions to be moved simply by dragging.
Create label
Lets you create a text (or image) label with additional information, such as required items for an area or directions through a maze.
Toggle Big Map
Shows a large map in the Main window. It can be useful if you need to move rooms around.
Fine tuning your map
Most of the time, the mapper will automagically draw new rooms and connect them as you walk around. Sometimes, however, you will need to manually move a room or group of rooms - either because the area layout would make them overlap with other rooms, or because the mapper fails to identify the exit.
Rooms that won't connect
Due to underlying game mechanics, there are rooms where the mapper won't be able to find the correct exit. This is unfortunately something that cannot be addressed without us recoding the whole game. When it happens, you will have to move the room manually to the correct position on the map. Note that you only have to do this the first time you visit the room and the mapper will remember where you placed it.
When it happens, you will get a message like this in your terminal window:
MAPPER: Unable to connect room 3129. Setting coordinates to 0/0/0.
NOTE: You will also get this message if you enter a new room by teleporting or hitchhiking. To save yourself the trouble of moving a large number of rooms, it is advised that you first visit a hitchhike point by foot if possible.
Since coordinates 0/0/0 can be a long way away from the previous room, backtracking one room, noting the coordinates, and then hand setting the new room to some coordinates nearby is often the best thing to do. Even if you don't get them exactly right, you at least get both rooms close enough to drag the offending room to the correct spot.
Overlapping rooms
The MUD world is not a perfect grid. Sometimes this won't be a problem, but there are areas where, without manual intervention, rooms will overlap. Unless you move these rooms yourself, you will end up with anything but a useful map.
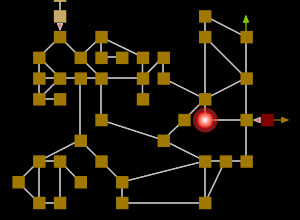
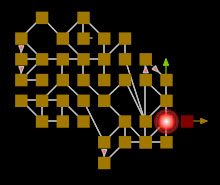
Consider the Grasslands:


The map on the left is what you'd get simply by walking around. In reality, it's even worse than it looks - a lot of the exits do not lead in directions one would assume from the map, because there are rooms piled on top of one another, some exits belonging to one room and other exits to another. The map on the right shows the real layout of the area and can be navigated reliably. It took maybe a couple of minutes to move some rooms around to make sense of the place.
Highlighting important rooms
One way to highlight a special room, such as a shop, a pub or a portal, is by adding a marker letter to it. If you (like me) have problems finding the Everlund hitchhike point, marking it with a H can make all the difference.
You can also change the colour of a room to make it stand out - some people like to mark rooms with autoattackers in this way. Make sure you pick a colour number higher than 256 though, otherwise the room terrain colour will overwrite your custom pick next time you visit the room.
Saving and copying maps
You can save your maps to a file for backup or to transfer them to another computer, and you can also easily copy maps between different Mudlet profiles. This isn't done in the Mapper window - you will need to go to Mudlet's Settings menu and navigate to the Mapper tab there. Here you have the options to save your map to a file, load it from a file or copy it to another profile.
You can also set the mapper to use high quality graphics here, and unless you are on an extremely slow computer, this should not affect performance. Try it, it does make the map a lot easier on the eyes.


